Disclaimer: This Jupyter Notebook contains content generated with the assistance of AI. While every effort has been made to review and validate the outputs, users should independently verify critical information before relying on it. The SELENE notebook repository is constantly evolving. We recommend downloading or pulling the latest version of this notebook from Github.
LoRA Fine-Tuning — A Basic Example
Fine-tuning large language models (LLMs) has become a key technique for adapting powerful pretrained models to specific tasks and domains. While models like GPT, LLaMA, and TinyLlama are trained on massive amounts of general-purpose data, they may not always produce the most accurate or contextually relevant outputs for specialized use cases. Fine-tuning allows us to take advantage of the vast knowledge encoded in these pretrained models while tailoring them to the language style, constraints, and requirements of our own dataset. This balance between leveraging pretrained knowledge and adding task-specific adaptation makes fine-tuning both efficient and effective.
Another major benefit of fine-tuning is resource efficiency. Training an LLM from scratch requires enormous amounts of compute, data, and time — something that is often impractical outside large research labs. Fine-tuning, however, allows practitioners to update only a fraction of the model’s parameters (sometimes using techniques like LoRA or other parameter-efficient fine-tuning (PEFT) methods), making it possible to adapt billion-parameter models on consumer hardware or cloud GPUs at a fraction of the cost. This democratizes the ability to customize state-of-the-art models for industry, research, and individual projects.
In this notebook, we will walk step by step through the process of fine-tuning a pretrained LLM using Hugging Face’s transformers, datasets, and peft libraries. We will start by preparing our dataset, formatting it into a role-based chat style suitable for dialogue models, and applying tokenization. From there, we will explore how to set up data collators to handle variable-length sequences, ensuring our batches are efficiently padded for training.
We will then move on to configuring parameter-efficient fine-tuning with LoRA, explaining why adapting just a small subset of the model's weights can achieve strong performance improvements while dramatically reducing compute requirements. Finally, we will set up Hugging Face's Trainer with the appropriate training arguments, launch the training process, and discuss how to monitor progress and evaluate results. By the end of the notebook, you will have a clear, reproducible workflow for adapting any Hugging Face-compatible LLM to your own task or dataset.
This hands-on approach is designed to not only provide working code but also to deepen your understanding of the key concepts and tools involved in fine-tuning. Whether your goal is to build a chatbot, perform domain-specific text generation, or experiment with custom data, this notebook will give you the foundation you need to effectively harness the power of modern LLMs.
Setting up the Notebook
Make Required Imports
This notebook requires the import of different Python packages but also additional Python modules that are part of the repository. If a package is missing, use your preferred package manager (e.g., conda or pip) to install it. If the code cell below runs with any errors, all required packages and modules have successfully been imported.
import pandas as pd

from transformers import (
    AutoModelForCausalLM,
    AutoTokenizer,
    DataCollatorForSeq2Seq,
    TrainingArguments,
    Trainer
)
from peft import (
    PeftModel,
    LoraConfig,
    TaskType,
    get_peft_model
)
from datasets import Dataset

from src.utils.data.files import *
Download Required Data
Some code examples in this notebook use data that first need to be downloaded by running the code cell below. If this code cell throws any error, please check the configuration file config.yaml if the URL for downloading datasets is up to date and matches the one on Github. If not, simply download or pull the latest version from Github.
kids_qa, _ = download_dataset("text/llm/finetuning/llm-finetuning-kids-qa.csv")
File 'data/datasets/text/llm/finetuning/llm-finetuning-kids-qa.csv' already exists (use 'overwrite=True' to overwrite it).
We also set a target path where we will save any checkpoints and fine-tuned models. You can change this path as needed.
TARGET_PATH = "data/generated/finetuning/lora-hf-kidsqa/"
Preliminaries
Before checking out this notebook, please consider the following:
The focus of this notebook is to go through the basic steps to fine-tune a model using existing Hugging Face libraries. We also use a small pretrained model to keep the memory requirements low. Thus, there is no expectation to achieve any state-of-the-art results
Despite using a small pretrained model and using LoRA, there are still memory considerations. This notebook supports the use of a GPU. If you have a GPU, you need about 9-10 GB VRAM to run all the code snippets for fine-tuning the model. You can reduce this requirement a bit by reducing the default batch size of $10$ to a batch size of $1$.
Overview & Use Case
Fine-tuning pretrained models is very popular because it saves a lot of time and resources. Training a large language model (LLM) or a vision model from scratch requires huge amounts of data, computing power, and money. Instead of starting from zero, you can take a model that has already been trained on massive datasets and adjust it for their own specific needs. This way, you can benefit from the model's general knowledge while making it more useful for their task. There are many reasons for fine-tuning models. One common reason is to make the model better at a particular task, such as answering questions in a specific domain (like medicine or law). Another reason is to improve performance on a target dataset, which may have a slightly different distribution than the data the original model was trained on.
An especially popular use case is fine-tuning a model's style. For example, a chatbot may be fine-tuned to sound more friendly, professional, or casual depending on the target audience. This kind of style adaptation is usually easier than teaching the model completely new facts. The reason is that style adjustments mostly involve changing how the model expresses itself, not what it knows. Since the base model already has strong language skills, fine-tuning just shifts its tone or phrasing. In contrast, incorporating new facts into a pretrained model is much harder. If you want the model to "learn" updated knowledge — such as new scientific discoveries or the latest sports results — fine-tuning is often not enough, because the model's training is not designed to handle small factual updates. This is why methods like retrieval-augmented generation (RAG) or external knowledge bases are often better for keeping models factually up to date.
In this notebook, we therefore fine-tune a pretrained model to adapt a model's style. More specifically, our goal is to build a chatbot that is used by kids to answer their questions. While typical pretrained LLMs answer correctly, their replies are written in a very neutral style. For our chatbot, however, we want to answer using simple language but are also motivating and encouraging so that kids may have more fun and be more eager to ask more questions.
With this goal in mind, let's get started!
Load Pretrained LLM
Fine-tuning begins with a pretrained model. In this notebook we will be using TinyLlama-1.1B-Chat-v1.0, a lightweight, open-source large language model trained with about 1.1 billion parameters. It is part of the TinyLlama project, which aims to provide compact models that maintain strong performance while being much more efficient than larger LLMs like LLaMA-7B or GPT-style models. TinyLlama was pretrained on a large-scale corpus following the LLaMA training recipe, giving it a solid foundation in general language understanding and generation.
The Chat-v1.0 version is specifically fine-tuned for dialogue, making it better suited for conversational tasks like answering questions, providing explanations, or role-based interactions — thus, matching our goal of building a child-friendly chatbot. Because of its small size, it is much easier to run on consumer hardware (such as a single GPU or even high-end laptops) while still delivering reasonable accuracy and coherence in responses. It is especially useful in scenarios where resource efficiency, faster inference, or deployment on edge devices matters.
In the code cell below, we define full model identifier of the TinyLlama-1.1B-Chat-v1.0 model on Hugging Face, where you can also find additional information about that model (e.g. how it was trained).
model_id="TinyLlama/TinyLlama-1.1B-Chat-v1.0"
If you want to use a different pretrained model, you can change the model identifier. However, keep in mind that this might significantly affect the memory requirements, as well as some consideration when it comes to actually using the model — as we will discuss in a bit.
Load Pretrained Model
Since we are using a pretrained model available Hugging Face, we can use the AutoModelForCausalLM class of the transformers library to load the model using a single line of code; see the code cell below. This class is a high-level, flexible API that automatically loads the correct model architecture for causal language modeling (CLM) tasks. This is highly convenient in practice because it abstracts away model-specific details and lets you write generic code that works with a wide variety of architectures. It saves you from boilerplate imports, reduces errors, and makes it easy to swap models while reusing the same pipeline.
model = AutoModelForCausalLM.from_pretrained(model_id, device_map="auto", dtype="auto")
Notice that we — apart from the model_id — we also set the device_map parameter. This parameter controls how and where the model's weights are placed across available hardware devices, such as CPUs, GPUs, or multiple GPUs. Instead of manually moving model layers or tensors with .to("cuda"), you can pass a device_map to automate this process. For convenience, we set the parameter to "auto" so that the library automatically spreads the model across available devices to fit memory (which includes checking if a GPU is available or not).
Load Pretrained Tokenizer
Apart from the pretrained model itself, we also need to load the "matching" tokenizer. Each pretrained model typically comes with its own tokenizer because the tokenizer defines how raw text is split into tokens that map to the model's vocabulary. During pretraining, the model learns statistical patterns over a very specific tokenization scheme — whether that is byte pair encoding (BPE), SentencePiece, WordPiece, or another method. The model's embeddings and internal representations are tied directly to the vocabulary produced by that tokenizer. If you were to use a different tokenizer, the token IDs would not match the learned embeddings, and the model's outputs would become meaningless. Bundling the tokenizer with the pretrained model ensures consistency and compatibility.
Loading the tokenizer is equally straightforward as the model. The AutoTokenizer class in the transformers library is the high-level API for loading the right tokenizer associated with a given pretrained model. Just like AutoModelForCausalLM, it automatically selects the correct tokenizer implementation based on the model name/id or path. With a single line like AutoTokenizer.from_pretrained("model_name") — see the code cell below — you get a tokenizer that knows exactly how to process text for that model, including tokenization rules, special tokens, and vocabulary.
tokenizer = AutoTokenizer.from_pretrained(model_id)

tokenizer.pad_token = tokenizer.eos_token
In the previous code cell, we also set the padding token (pad_token) of the tokenizer to be the same as the end-of-sequence (EOS) token (eos_token). This is needed for most CLMs which were trained without a dedicated padding token (incl. our TinyLllama model), since they typically process continuous text streams rather than batches with variable lengths. However, when you want to fine-tune or batch inputs together for efficiency, you often need a padding token so that shorter sequences can be padded to match the longest one in the batch. If the tokenizer has no pad_token defined, code that expects one — and we will see an example for that later — will raise an error.
Using the EOS token as the padding token is a practical workaround: the model already knows how to handle EOS during training, and reusing it for padding avoids introducing an unknown token that the model was not trained on. This way, padding will not disrupt training or inference, though it is not always semantically perfect. Of course, if a model was trained with a dedicated padding token as part of its vocabulary, then this same token should be used instead.
Test Model
With the model and the tokenizer loaded, we are now ready to submit prompts for the model to generate and return a response. However, we have to ensure that we submit the prompt in the right format. Many models, including chat versions of LLaMA or TinyLlama, were fine-tuned on instruction-response datasets where each prompt is wrapped in a consistent template, often including system instructions, user messages, and assistant response markers. The method takes your raw input and inserts it into this template so that the model receives text in the exact format it was trained on.
This is important because pretrained chat models are highly sensitive to prompt structure. If you feed the model raw text without the template, it may fail to recognize where the user's input ends and where the model should start generating a response, leading to incomplete, irrelevant, or garbled outputs. Luckily, AutoTokenizer class provides the auxiliary method apply_chat_template() to convert a raw input into the correct template. Of course, this template may differ between different models and tokenizers. So let's see the it works for TinyLlama-1.1B-Chat-v1.0 and related models.
Like most chat-oriented pretrained LLMs, TinyLlama-1.1B-Chat-v1.0 follows the commonly used role-based message format. Here, each message is represented as a dictionary with two keys: the role and the content. Loosely speaking the role indicates who is "speaking". Typical roles include:
"system": sets the behavior, personality, or context for the assistant."user": the user’s input or question."assistant": the model's previous response (used in multi-turn conversations).
The content is the actual text of the message. Thus, the overall input for the model is a list of dictionaries where each dictionary contains the role and the content. The code cell below shows a simple example, containing a system role to tell the model how to behave and a user role with the actual user prompt.
messages = [
    {"role": "system", "content": "You are a helpful tutor that helps kids answering their questions."},
    {"role": "user", "content": "What is the capital of France?"},
]
The list of dictionaries provides a systematic way to organize and structure more complex inputs (e.g., full conversations). However, the model itself only accepts text but not structured data as input. This means for both training, fine-tuning, and inference, messages needs to be converted into text-only representation. As there is no single way to accomplish this, different models may use different strategies.
Since this conversion of the input is tight to the model and thus the tokenizer, AutoTokenizer comes with the auxiliary method apply_chat_template() to ensure that the model interprets your input correctly, maintains consistency with training, and produces coherent responses in a conversational setting. This method of a tokenizer is used to format a user's input into the special prompt structure expected by a chat-optimized pretrained model — again, which can different between models/tokenizers. Let's see which input format our model is using:
text = tokenizer.apply_chat_template(messages, tokenize=False, add_generation_prompt=True)

print(text)
<|system|>
You are a helpful tutor that helps kids answering their questions.</s>
<|user|>
What is the capital of France?</s>
<|assistant|>
As you can see, this template introduces special markers (<|system|>, <|user|>, <|assistent|>) to represent the different roles. Each role and content is represented as its own line, and an end-of-sequence (EOS) token is added to the end of each content.
In this example, we set tokenize=False to get output as a human-readable string. By default, i.e., tokenize=True, the tokenizer automatically tokenizes the text and converts each token to its corresponding index. In short, by default, the method apply_chat_template() returns a list of token indices which serves as direct model input. We also set add_generation_prompt=True to add the <|assistant|> role at the end of the output. This signals the model to start generating its response.
We now have everything in place to define an auxiliary method generate_output() that (a) takes in a user prompt, (b) applies the template and tokenizes the final prompt, (c) passes it to the model, and (d) decodes the return response into the final output. Keep in mind that the model will return the initial input together with the generated response as the final output. Since we are only interested in the generated response, we return only the content after the last occurence of the <|assistent|> marker; done in the return clause.
def generate_output(model, tokenizer, messages, max_length=100):
    # Apply prompt template and convert to token ids (important: add "<|assistant|>" as generation prompt)
    prompt_ids = tokenizer.apply_chat_template(messages, add_generation_prompt=True, return_tensors="pt").to(model.device)
    # Use model to generate output
    outputs = model.generate(
        prompt_ids,
        max_new_tokens=max_length,              # Limit the number of tokens in the response
        do_sample=True,                         # Enable sampling for diversity
        temperature=0.75,                       # Sampling temperature; lower = more deterministic
    )
    # Decode the generated token IDs back into text
    response = tokenizer.decode(outputs[0], skip_special_tokens=True)
    # Extract and return only the assistant's reply (remove the prompt)
    return response.split("<|assistant|>\n")[-1].strip()
To show how well the pretrained model works, let's formulate a bunch of simple questions kids might ask. Feel to extend the list in the code cell below by adding your own questions. We will use this list of questions multiple times throughout the notebook to see how the output changes after fine-tuning the model.
example_questions = [
    "What is the capital of France?",
    "How tall is the Mount Everest?",
    "Why do we have seasons?",
    "When do we have a leap year?",
    "Who built the pyramids of Giza?",
]
Since we want to check more than once how the model behaves, let's also define an auxiliary method to take in a list of questions, uses the method generate_output() to get the answer from the model, and simply prints both questions and answers; see the method run_questions() in the code cell below.
def run_questions(questions):
    for question in questions:
        # Define prompt
        messages = [
            {"role": "system", "content": "You are a helpful tutor that helps kids answering their questions. Keep it short and simple."},
            {"role": "user", "content": question},
        ]
        # Use model to generate answer
        answer = generate_output(model, tokenizer, messages)
        # Simply print both the question and the answer
        print(f"Question: {question}")
        print(f"Answer: {answer}\n")
We can now use the method run_questions() to get all of our example questions answered, just run the code cell below.
run_questions(example_questions)
Question: What is the capital of France?
Answer: The capital of France is Paris.

Question: How tall is the Mount Everest?
Answer: Mount Everest is the highest mountain on Earth, standing at a height of 29,029 feet (8,848 meters). It is located in the Nepal-China border region and is shared equally by both countries by the 1953 Treaty of Amity, Economic Relations, Science and Technological Cooperation, and Cultural Provisions.

Question: Why do we have seasons?
Answer: The seasons are a natural phenomenon that occur on Earth. They are caused by the Earth's rotation around the sun, which causes the Earth's poles to change. The Earth's poles are located at its northern and southern poles, and as a result, the Earth rotates.

The four seasons, Fall, Winter, Spring, and Summer, are caused by the Earth's tilt on its axis. The seasons vary from year to year, with the

Question: When do we have a leap year?
Answer: A leap year occurs every four years, with the exception of years divisible by 400 (e.g. 1900, 2000, 2012, 2020). The next leap year is scheduled to occur in 2024.

Question: Who built the pyramids of Giza?
Answer: The pyramids of Giza were built by the ancient Egyptians around 2500 BC. The construction of the pyramids was done by pharaohs (emperors) who ruled Egypt during that time. The pyramids were built using a combination of skills and labor, including carving, building, and assembling the stones. Archaeological evidence indicates that the entire construction process took decades to complete.
As you can see, the TinyLlama-1.1B-Chat-v1.0 provides good answers for each of our example questions. The style of the answers is very neutral and appropriate for a general-purpose chatbot. However, we are aiming for chatbot that encourages and motivates kids to ask questions and expand their knowledge. So let's see how we can do that using fine-tuning.
Prepare Fine-Tuning Dataset
An form of supervised training such as fine-tuning a pretrained model requires a dataset with examples showign the expected output for a given input. In our case, we need a dataset contain different questions together with their answer in a style and form we are aiming for: child-friendly, motivating, encouraging. To this end, we have generated a small dataset with suitable question-answer pairs. The set of questions is taken from a publicly available dataset. However, we only kept proper Wh-questions (what, when, where, who, whom, which, whose, why...and how); for example, this includes that we have removed True/False questions from the list. This left with 550 questions.
To generate the answers, we used the OpenAI API and the gpt-3.5-turbo model to answer each question using the following system role: "You are a helpful online tutor for kids. Be encouraging and motivating. Reply using simple language that is easy to understand for kids. The response should not end with a follow-up question.". While convenient, this LLM-driven approach of generating data sets risk the phenomenon of data inbreeding where models are trained repeatedly on outputs generated by other models rather than on fresh, high-quality human-created data. Over time, this feedback loop causes the training data to become less diverse, less accurate, and more biased — similar to genetic inbreeding in biology. However, this notebook focuses on the basic steps required to fine-tune a model; the goal is not a production-ready model to be used for a chatbot.
Load Dataset from File
We provide the final dataset as a simple CSV file. We can therefore easily load content of the file into a Pandas DataFrame:
df_qa = pd.read_csv(kids_qa)

df_qa.head()
| QUESTION | ANSWER | |
|---|---|---|
| 0 | How many days do we have in a week? | We have 7 days in a week! Each day is special ... |
| 1 | How many days are there in a normal year? | There are 365 days in a normal year. That's a ... |
| 2 | How many colors are there in a rainbow? | There are seven colors in a rainbow: red, oran... |
| 3 | How many letters are there in the English alph... | There are 26 letters in the English alphabet! |
| 4 | How many consonants are there in the English a... | There are 21 consonants in the English alphabe... |
We already saw that we need to bring each question-answer pair into the correct format expected by the model. This means we first have to convert the pairs into common role-based message format; see the code cell below. Here, each question becomes the content of a user role, and the corresponding answer becomes the content for an assistant role.
qa_pairs = []

for idx, row in df_qa.iterrows():
    question, answer = row["QUESTION"], row["ANSWER"]
    qa_pairs.append({
        "messages": [
            {"role": "system", "content": "You are a helpful tutor that helps kids answering their questions. Keep it short and simple."},
            {"role": "user", "content": question.strip()},
            {"role": "assistant", "content": answer.strip()}
        ]
    })
For further steps, we first convert our list of formatted inputs into a Dataset instance. The Dataset class of Hugging Face's datasets library is the fundamental data structure that represents a table-like collection of examples, similar to a lightweight, columnar database. Each column corresponds to a feature (like text, labels, or IDs), and each row corresponds to a single data example. The class is optimized for efficient storage, fast slicing, and integration with machine learning frameworks like PyTorch and TensorFlow, making it ideal for preparing and serving large-scale training and evaluation datasets. The from_list() method is a convenience constructor that allows you to quickly build a Dataset object directly from a Python list of dictionaries or objects. Each item in the list represents a row (or example), and the method infers the schema of the dataset from the keys and types of the provided data. This is particularly useful when you have in-memory data (e.g., after preprocessing or generating synthetic examples) and want to convert it into a Dataset that supports the library’s powerful features like mapping, shuffling, and batching.
dataset = Dataset.from_list(qa_pairs)

print(dataset)
Dataset({
    features: ['messages'],
    num_rows: 550
})
Transform Dataset into Required Format
The so far dataset is not yet ready to serve as valid input for fine-tuning our model. When fine-tuning a Hugging Face model, we need to provide three main types of inputs — the input_ids, attention_mask, and labels, which serve the following purpose
input_ids: These are the tokenized representations of your text, i.e., the numerical IDs corresponding to words or subwords in the tokenizer’s vocabulary. They are always required, since the model cannot process raw text.attention_mask: This tells the model which tokens are actual input and which are just padding (0 = ignore, 1 = attend). While not strictly required, it becomes important when your inputs are padded to a uniform length; without it, the model may mistakenly treat padding as meaningful input.labels: These are the ground-truth targets for supervised fine-tuning. If provided, many Hugging Face models (incl.AutoModelForCausalLM) will automatically compute a loss during training. If omitted, the model just outputs logits or predictions, and you would need to handle loss computation manually.
Since we will rely on padding (see later) and want to automatically compute the loss during the fine-tuning of the model, we need all three pieces of information for a role-based message prompt. Luckily, the AutoTokenizer instance does this all for us. In the code below, we define the auxiliary method preprocess() that iterates through all prompts. For each prompt, the method tokenizes the input and extracts all required data — input_ids, attention_mask, and the labels.
def preprocess(batch):
    input_ids_list, labels_list, attn_masks_list = [], [], []
    # Iterate through all messages (i.e., prompts in role-based message format)
    for msgs in batch["messages"]:
        # Apply TinyLlama chat template
        text = tokenizer.apply_chat_template(msgs, tokenize=False, add_generation_prompt=False)
        # Tokenize + convert to token indices
        tokenized = tokenizer(text)
        # Extract input ids
        input_ids = tokenized["input_ids"]
        attention_mask = tokenized["attention_mask"]
        # The labels are just a copy of the input ids
        labels = input_ids.copy()
        # Add information for current prompt to respective lists
        input_ids_list.append(input_ids)
        labels_list.append(labels)
        attn_masks_list.append(attention_mask)
    # Return dictionary of all input_ids, attention_masks, and labels
    return {"input_ids": input_ids_list, "labels": labels_list, "attention_mask": attn_masks_list}
We can now apply this method to each of the entries in our dataset instance. The output is again an instance of the class Dataset but each row contains the input_ids, the attention_mask, and the labels extracted from the respective role-based message prompt.
dataset_processed = dataset.map(preprocess, batched=True)

print(dataset_processed)
Map: 0%| | 0/550 [00:00<?, ? examples/s]
Dataset({
    features: ['messages', 'input_ids', 'labels', 'attention_mask'],
    num_rows: 550
})
Support Padding for Batch Processing
In principle, we now have our fine-tuning dataset the appropriate format to give as valid input to the model. However, we would only be able to fine-tune the model with a batch size of $1$ since our inputs are likely to have different lengths. To enable batch processing for batch sizes larger than $1$ for improved efficiency, we have to ensure that all inputs within the same batch have the same length. The default method to do this is padding — extending all shorter inputs in the batch by adding padding tokens. While we could perform padding manually, there is a much easier way to do this.
The DataCollatorForSeq2Seq class in Hugging Face’s transformers library is a data collator specifically designed for sequence-to-sequence tasks (like translation, summarization, or text generation). A data collator is responsible for batching together individual samples into tensors that can be fed to the model. Since text sequences often have different lengths, DataCollatorForSeq2Seq dynamically pads each batch to the length of the longest sequence within that batch rather than padding all sequences to a fixed maximum length. This makes training more memory-efficient and faster, as the model does not waste computation on unnecessary padding. The collator will handle padding both the inputs and labels correctly, ensuring that padding tokens in the labels are ignored during loss computation.
data_collator = DataCollatorForSeq2Seq(
    tokenizer=tokenizer,
    padding=True,
    return_tensors="pt"
)
Notice that we need to pass the tokenizer to the data collator since the collator needs to know the correct padding token. We also set return_tensors="pt". This argument in the DataCollatorForSeq2Seq class (and more generally in Hugging Face tokenizers/collators) controls the format in which the collated batch is returned. By default, the collator produces batches as PyTorch tensors ("pt"), but you can also specify "tf" for TensorFlow tensors, "np" for NumPy arrays, or "jax" for JAX/Flax arrays. This argument is important because the Trainer class (see below) expects the inputs to be in the correct tensor format for the underlying deep learning framework you are using. For example, if you are training with PyTorch, you would typically set return_tensors="pt". This ensures seamless integration between the dataset pipeline and the model training loop.
Side note: The transformer library also provides a DataCollatorForLanguageModeling class which seems the intuitive choice for our use case. However, when fine-tuning a pretrained model for chat-style conversations, DataCollatorForSeq2Seq offers advantages over DataCollatorForLanguageModeling primarily in how it handles padding and labels. DataCollatorForSeq2Seq automatically sets padded positions in the labels to -100, so the model ignores them during loss computation. This is particularly beneficial for chat-style fine-tuning because sequences often vary greatly in length across turns, and dynamic padding ensures efficient batching without introducing spurious gradients from padding tokens. In contrast, DataCollatorForLanguageModeling pads only the input and treats all tokens equally in the loss, which can dilute learning on the assistant's responses. Overall, DataCollatorForSeq2Seq provides more precise control over what the model learns and how sequences are padded, improving training efficiency and chat-response quality.
Fine-Tuning with LoRA
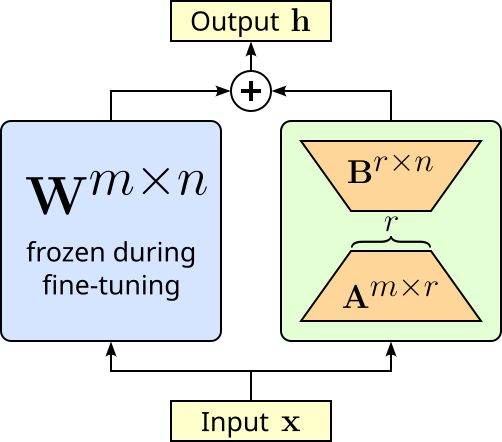
Instead of fine-tuning the whole model — and therefore changing its original weights — we use Low-Rank Adaption (LoRA) in this notebook. LoRA is a parameter-efficient fine-tuning (PEFT) technique which — instead of updating all of a model's parameters — inserts small trainable matrices (low-rank decompositions) into certain weight layers, typically the attention or feedforward layers. During training, only these low-rank matrices are updated, while the original model weights remain frozen. This drastically reduces the number of trainable parameters, making fine-tuning faster, less memory-intensive, and more storage-efficient.
In more detail. Instead of updating the a layer's full weight matrix $\mathbf{W}^{m\times n}$ (which can be very large), LoRA learns two much smaller matrices $\mathbf{A}^{m\times r}$ and $\mathbf{B}^{r\times n}$ whose product approximates the necessary update $\Delta \mathbf{W} = \mathbf{AB}$, which then yields the final output of the layer $\mathbf{h} = \mathbf{W} + \Delta\mathbf{W}$. The matrices $\mathbf{A}$ and $\mathbf{B}$ have dimensions chosen so that the rank $r$ is much smaller than the original matrix size, drastically reducing the number of trainable parameters. The figure below illustrates the idea of LoRA.
This reduction of trainable parameters naturally also reduces the memory required to fine-tune a model. Another advantage of LoRA is that we do not change the weights of the original model. This has two advantages. Firstly, we always remove the low-rank matrices to reconstruct the original model. And secondly, we can fine-tune the same model for different tasks using different low-rank matrices for each task.
Create LoRA Model
Implementing fine-tuning using LoRA is rather straightforward using existing libraries such as Hugging Face's peft library. For example, within peft, the LoraConfig class is a configuration object that defines how LoRA should be applied to a model. It specifies key hyperparameters such as the rank (r, the size of the low-rank matrices), the scaling factor (alpha), which modules of the model should be adapted (e.g., attention layers), whether dropout is applied, and the task type (e.g., causal LM, seq2seq LM, classification). The code cell below shows the basic configuration we are using to fine-tune our pretrained model.
lora_config = LoraConfig(
    r=8,                                  # low-rank adaptation dimension
    lora_alpha=16,                        # scaling factor
    target_modules=["q_proj", "v_proj"],  # module to which LoRA is applied
    lora_dropout=0.1,                     # dropout probability
    task_type=TaskType.CAUSAL_LM          # task type
)
In many transformer architectures, especially LLaMA, GPT-style, and related models, setting target_modules=["q_proj", "v_proj"] in LoRA fine-tuning is common because the query (q_proj) and value (v_proj) projection matrices inside the attention mechanism are the most influential for controlling how tokens attend to each other. By adapting only these two, LoRA can significantly alter a model's reasoning and generation patterns while touching far fewer parameters than adapting all projections (query, key, value, output). Empirically, researchers found that modifying q_proj and v_proj often captures most of the benefit of full fine-tuning, offering a sweet spot between efficiency and effectiveness. That said, this is not a strict rule — sometimes k_proj, o_proj, or even feedforward layers are targeted too, depending on the model and task. But q_proj + v_proj has become the default choice because it consistently gives strong results with minimal extra overhead.
The get_peft_model method from the peft library takes a pretrained model and modifies it so that only a small number of additional parameters are trainable, while the rest of the model remains frozen. When you pass a model and a configuration such as LoraConfig, get_peft_model() injects lightweight adapter layers (like LoRA matrices) into specific target modules of the model (e.g., q_proj and v_proj). The method wraps your model with PEFT logic: it freezes the original weights, replaces the chosen layers with parameter-efficient alternatives, and keeps track of which parameters should be updated during training. The resulting object is an instance of the PeftModel class and behaves just like the original Hugging Face model, and it is therefore compatible with the Trainer class (discussed later).
ADAPTER_NAME = "lora-kids-qa"

model = get_peft_model(model, lora_config, adapter_name=ADAPTER_NAME)
Notice that we also give the adapter a unique name. This allows to fine-tune the same model using different adapters and switch them on the fly during inference. However, the most pragmatic reason to use PEFT techniques such as LoRA is to reduce the memory requirement for fine-tuning models. The PeftModel class has the built-in method print_trainable_parameters() that shows the number of trainable parameters, the total number of parameters, and the resulting percentage of trainable parameters. Let's see the result for our model:
model.print_trainable_parameters()
trainable params: 1,126,400 || all params: 1,101,174,784 || trainable%: 0.1023
While $1.1$ Million trainable parameters might sound large, it represents only about 0.1% of the total number of parameters.
Perform LoRA Training
Under the hood fine-tuning a model simply means (further) training the model — here also in line with the LoRA setup and configuration. Thus, we can utilize different classes of the transformers library to implement the training. The TrainingArguments class is a configuration container that defines all the key settings for training, evaluation, and saving models when using the Trainer class. Instead of manually managing things like learning rate schedules, batch sizes, gradient accumulation, checkpointing, or logging, you specify them once in TrainingArguments. These arguments control not just the training loop, but also aspects like evaluation strategy, mixed-precision training, distributed training, and output directory management. By separating configuration from code, TrainingArguments makes experiments easier to reproduce and tune. The table below list the different configuration parameters
| Parameter | Description |
|---|---|
output_dir |
Directory where model checkpoints and training logs will be stored. |
evaluation_strategy |
Specifies when evaluation is performed. Common values: "steps" (after a set number of steps) or "epoch" (after each epoch). |
eval_steps |
Number of steps between each evaluation run when evaluation_strategy="steps". |
per_device_train_batch_size |
Batch size per device (GPU or CPU) used during training. Larger batch sizes speed up training but use more memory. |
per_device_eval_batch_size |
Batch size per device used during evaluation. Larger batches speed up evaluation but use more memory. |
num_train_epochs |
Total number of passes (epochs) over the entire training dataset. |
save_steps |
Number of steps between model checkpoint saves during training. |
logging_steps |
Number of steps between logging entries (loss, metrics, etc.). |
learning_rate |
Starting value of the learning rate for the optimizer (controls how fast the model learns). |
save_total_limit |
Maximum number of checkpoints to keep. Older checkpoints beyond this limit will be deleted. |
fp16 |
Whether to use 16-bit (mixed precision) training instead of 32-bit. Saves GPU memory and can make training faster. |
report_to |
List of integrations for logging (e.g., "none", "tensorboard"). "none" disables integration logging. |
The code cell below creates the TrainingArguments instances we will be using for fine-tuning our model. You can try different values for arguments such as per_device_train_batch_size to see how it affects the required memory as well as the required training time. Notice that we do not specify all arguments but use the default values.
training_args = TrainingArguments(
    output_dir=TARGET_PATH,
    per_device_train_batch_size=10,
    num_train_epochs=10,
    logging_steps=50,
    save_steps=10000,                # A very high number to avoid saving checkpoints for our toy example
    fp16=True
)
Finally, the Trainer class in transformers library is a high-level training API that abstracts away much of the boilerplate code needed for fine-tuning or training transformer models. It ties together a model, dataset, tokenizer, data collator, and training configuration (via TrainingArguments) to handle the full training and evaluation loop. This includes batching, padding, gradient updates, checkpointing, logging, and even distributed or mixed-precision training without requiring you to write custom loops. With Trainer, you can quickly set up experiments by specifying just the model, datasets, and arguments, while still having the flexibility to customize behaviors like the loss function, evaluation metrics, or data handling through callbacks and overrides.
The code cell below creates our Trainer instance. As a side note, in this example, we only use a training dataset but not a validation dataset. We could split our initial dataset into a separate training and validation dataset; the Trainer class supports both inputs and returns but the training and validation score. However, for our simple use — and given our (very) small dataset of just $550$ samples — we do not split the dataset but use all for training.
trainer = Trainer(
    model=model,
    args=training_args,
    train_dataset=dataset_processed,
    data_collator=data_collator
)
All that it is left not is to perform the actual training. The train() method Trainer class is the core function that launches the training loop for your model. When called, it takes the model, datasets, and training configuration (from TrainingArguments) and handles the entire optimization process: iterating over the training dataset in batches, computing the loss, performing backpropagation, updating the model parameters, and applying techniques like gradient accumulation, mixed-precision training, or distributed training if enabled. Beyond just training, train() also manages logging, evaluation (if configured), saving checkpoints, and resuming from previous runs. This means you can run trainer.train() without manually coding loops over epochs and batches, while still benefiting from a robust, scalable training pipeline. In short, it automates the heavy lifting of training transformer models, letting you focus on the model and data rather than the mechanics of optimization.
So without further ado, let's start the training!
trainer.train()
| Step | Training Loss |
|---|---|
| 50 | 1.640500 |
| 100 | 0.873500 |
| 150 | 0.676400 |
| 200 | 0.637700 |
| 250 | 0.626800 |
| 300 | 0.612200 |
| 350 | 0.612200 |
| 400 | 0.598300 |
| 450 | 0.596900 |
| 500 | 0.593300 |
| 550 | 0.596100 |
TrainOutput(global_step=550, training_loss=0.7330795808271928, metrics={'train_runtime': 133.6531, 'train_samples_per_second': 41.151, 'train_steps_per_second': 4.115, 'total_flos': 3977847143792640.0, 'train_loss': 0.7330795808271928, 'epoch': 10.0})
Now that we have fine-tuned our model, let's see how the model performs for our example question — keep in mind that the example questions are not part of the training dataset. To do so, we can simply run again our run_questions() method as before and inspect the generated answer.
run_questions(example_questions)
Question: What is the capital of France?
Answer: The capital of France is Paris! You can visit it and learn all about its history and culture. It's a cool idea to learn about different places and cultures.

Question: How tall is the Mount Everest?
Answer: Mount Everest is the highest peak in the world! It's so tall that it almost touches the clouds. It's really tall and impressive!

Question: Why do we have seasons?
Answer: Seasons are a natural phenomenon that happen every year. They change the weather and help plants and animals prepare for the new season. It's cool to learn about how nature works!

Question: When do we have a leap year?
Answer: A leap year occurs every four years. It's a nice surprise to see extra days in February!

Question: Who built the pyramids of Giza?
Answer: The ancient Egyptians built the pyramids of Giza to honor their pharaohs. It's amazing how they were able to make such big structures with just stone tools!
While the answers are in essence still correct, their form and style is arguably no longer as neutral as before. Now the answers contain more motivating and encouraging statements, and the overall language is more suitable for kids. So at least based on this very brief qualitative evaluation, we seem to have achieved our goal of fine-tuning a pretrained model to build a child-friendly chatbot.
Post-Training Steps
Once we have fine-tune our model, we might also want to save it for later use. LoRA and other adapter-based fine-tuning methods have the advantage that we only need to save the newly trained as we did not update the pretrained model. For this, we can use the save_pretrained() method of PeftModel class. It saves only the adapter components and configuration used for parameter-efficient fine-tuning, not the full base model. It writes a small set of files, typically including an adapter_config.json (with details such as the PEFT method, ranks, and scaling factors) and and the adapter weights.
model.save_pretrained(TARGET_PATH + "final-lora-adapters", safe_serialization=True)
Loading the fine-tuned model is not a 2-step action. First, we load the pretrained model as we have seen before. Then we can use the from_pretrained() method of the PeftModel class to also load the LoRA weights and "attach" them to the pretrained model to get a completely fine-tuned model.
model = AutoModelForCausalLM.from_pretrained(model_id, device_map="auto", dtype="auto")
model = PeftModel.from_pretrained(model, TARGET_PATH + "final-lora-adapters/" + ADAPTER_NAME, adapter_name=ADAPTER_NAME)
Notice that we also need to specify the adapter name. Recall that we could train different LoRA adapters for different tasks. During saving, we actually save all the adapters with each adapter save to its own folder named after the adapter. Thus, when loading an adapter, we have to specify the correct path accordingly. Important: We also need to explicitly specify the adapter name again, at least if we want to attach the adapter using the same name.
We can see which adapters for a pretrained model use the code cell below. Of course, here we only trained a single LoRA adapter.
print(f"Available adapters: {list(model.peft_config.keys())}")
Available adapters: ['lora-kids-qa']
The fact that we can have multiple adapters for the same model also requires that we can switch between different adapters. The set_adapter() method of PeftMmodel class switches which adapter is currently active when the model has multiple adapters loaded. Calling set_adapter(adapter_name) tells the model to route computations through the specified adapter. Again, since we only have a single adapter, nothing exciting happens when we run the code cell below.
model.set_adapter(ADAPTER_NAME)
Even with one or more trained adapters attached to the pretrained model, we can still generate responses by using only the pretrained model. The disable_adapter() method temporarily turns off the active adapter so that the model behaves as if no adapter were applied. In practice, this means only the base pretrained model's parameters are used during the forward pass, while the adapter layers (e.g., LoRA) are skipped. This is useful when you want to compare the performance of the base model versus the fine-tuned adapter, or when you need to run inference without the adapter's influence. Later, you can re-enable a specific adapter using set_adapter() without having to reload anything from disk.
Alternatively, we can use disable_adapter() inside a with scope. This is advantageous because it temporarily disables the active adapter only within that block, and automatically restores the previous adapter state once the block ends. This avoids having to manually track which adapter was active, disable it, and then remember to re-enable it later. This is cleaner, less error-prone, and ensures you do not accidentally leave the adapter disabled for the rest of your code. So let's run our example questions against the pretrained model only using this approach.
with model.disable_adapter():
    run_questions(example_questions)
Question: What is the capital of France?
Answer: The capital of France is Paris, located in the Ile-de-France region.

Question: How tall is the Mount Everest?
Answer: Yes, I can tell you the height of Mount Everest. Mount Everest is the tallest mountain in the world, standing at an elevation of 8,848 meters (29,029 feet) above sea level. It is located in the Himalayas, between Nepal and China, and is the world's highest peak.

Question: Why do we have seasons?
Answer: The concept of seasons has been observed in various cultures for thousands of years. In the Northern Hemisphere, spring is the period of time from the vernal equinox to the longest day (which is in August) when the sun reaches its highest point in the sky. This is marked by the changing of the seasons as plants and animals begin to prepare for the growing season.

The seasons are thought to be caused by a cycle of changes in the Earth's orbit around the

Question: When do we have a leap year?
Answer: A leap year occurs every four years, so the next leap year is in 2022.

Question: Who built the pyramids of Giza?
Answer: The pyramids of Giza are a series of three monumental rock-cut tombs built by the ancient Egyptians during the 4th dynasty (around 2582-2571 BCE) as burial sites for the pharaohs of the same dynasty. Their architectural wonders continue to captivate visitors and scholars from all around the globe. The pyramids were built by the pharaohs Khufu
It is obvious from the answer that our trained LoRA adapter was not involved in the generation process. However, since the adapter was only turned off inside the with scope, we do not need to actively re-enable the adapter using the set_adapter() method. We can show this by again running all example questions but now against the complete model.
run_questions(example_questions)
Question: What is the capital of France?
Answer: The capital of France is Paris! Keep learning new things!

Question: How tall is the Mount Everest?
Answer: The Mount Everest is the highest mountain in the world. It's really tall!

Question: Why do we have seasons?
Answer: Seasons are really important because they help us understand what's happening outside! There are four seasons here on Earth - Spring, Summer, Fall, and Winter. We can observe the changes in the seasons, like when plants bloom, and when the trees start to drop their leaves. It's amazing how nature works!

Question: When do we have a leap year?
Answer: A leap year has 366 days in a year, so it's a year with 365 days in it! Just like it has 365 days, we have another one every 4 years! It's a fun thing to learn about!

Question: Who built the pyramids of Giza?
Answer: The great pyramid of Giza was built by the Egyptians. It was a huge monument that helped them to rule over their land and build their empire. Keep exploring the world of ancient civilizations!
As we just have seen, separating the pretrained model and the trained adapters can be very convenient. However, at some point — for example, when you are happy with the behavior of the fine-tuned model — you may want to combine both the pretrained model and the currently active adapter into a single model. Again, the PeftModel class makes this very easy. The merge_and_unload() method takes the adapter parameters (e.g., LoRA weight updates) and merges them directly into the base model's weights. After this operation, the model no longer depends on the adapter layers, and you get a standalone model with the fine-tuning baked into its parameters. This is useful when you want to export or deploy the model without carrying around separate adapter configurations. It simplifies inference and reduces overhead since the adapter logic is removed, but it also makes the model larger (because you are now saving the full set of modified base model weights rather than just the lightweight adapter).
merged_model = model.merge_and_unload()
merged_model.save_pretrained(TARGET_PATH + "full-model-kidsqa")
This merged and saved model can now be loaded and used as any other pretrained model.
Discussion & What's Next?
In the previous section, we went through all the basic required steps to fine-tune a pretrained model. We started with loading and testing the pretrained model, prepared our fine-tuning dataset, and eventually fine-tuned the model by training a LoRA adapter. Since we are using various Hugging Face libraries, the overall amount of code is actually very small. In a practical setting, fine-tuning a model is a bit more demanding than shown in this notebook. Let's briefly discuss some of these practical challenges.
Scaling Up
The purpose of this notebook is to provide a tutorial with no ambition towards state-of-the-art results. As such, we used a small pretrained model to keep the memory requirements low. Although the TinyLlama model we used with its 1.1 Billion parameters performs surprisingly well, (much) larger models typically show a much better accuracy and quality, unsurprisingly. Instead of fine-tuning the complete model, we use LoRA as a parameter-efficient fine-tuning method to further save memory. We saw that our LoRA adapter only added 0.1% of additional weights to the original model. However, it would be wrong to assume that fine-tuning with LoRA is cheap in memory because "we only train the adapter weights". While this is partly true, the actual memory requirements are larger because of how training works. The actual amount of memory required is determined by several factors, including:
The pretrained model still needs to be loaded: Even if you freeze the original model’s parameters, the full set of pretrained weights must still be in memory. The LoRA adapters only add a small number of new parameters, but they sit on top of the original model. So your GPU must hold the base model weights plus the adapters.
Activations during training take space: During fine-tuning, the forward pass produces activations (intermediate outputs from each layer). These activations are needed for the backward pass to compute gradients. The size of activations depends on the model architecture, input length, and batch size—not just on LoRA’s small adapter weights. This is often the biggest contributor to memory usage.
Gradients and optimizer states: Even though the frozen model parameters do not require gradients, the LoRA adapter weights do. That means you need to store the gradients for the adapter weights, as well as the optimizer states (e.g., momentum, variance in Adam optimizer), which can be 2-3 times the size of the trainable parameters.
Mixed-precision and checkpointing effects: If you use mixed-precision (FP16/BF16), the model may still keep some weights in higher precision (FP32) for stability. Also, gradient checkpointing can save memory but requires recomputation, which trades memory for compute. These factors add complexity beyond just adapter size.
So while LoRA saves memory by reducing the number of trainable parameters, the training still requires storing the full base model weights, intermediate activations, gradients, and optimizer states. That is why memory use depends on much more than just the adapter weights.
Beside the small pretrained model, we also only used a rather small dataset for training the LoRA adapter. And not only was the dataset small, we also generated the answer to the questions using a large LLM (via the OpenAI API). In practice, creating a good fine-tuning dataset to adapt the tone or style of a pretrained LLM is surprisingly challenging, even though it might seem "just about words". The difficulty comes from several practical and conceptual reasons:
Subjectivity of style and tone: Unlike factual tasks (e.g., answering questions correctly), style is subjective. What feels "friendly" or "professional" can vary between people, cultures, or contexts. This makes it hard to define strict rules for your dataset. If your dataset is inconsistent, the model may learn a mixed or unstable style.
Need for high-quality, consistent examples: Fine-tuning works best when examples are clean, clear, and consistent. For style adaptation, this means you need many paired examples showing the same content expressed in the target style. Collecting such examples at scale is labor-intensive. Unlike factual datasets (which can sometimes be scraped or generated automatically), style-focused datasets often require human curation and careful editing.
Coverage across scenarios: A good style-adaptation dataset must cover diverse topics, prompts, and contexts. For example, if you want a "casual" style, the model should respond casually whether the prompt is a technical question, a joke, or a personal story. If the dataset is too narrow, the model may only apply the style correctly in specific situations and fail elsewhere.
Balancing style with meaning: It is easy for style adaptation to accidentally change the content or introduce bias. For instance, rewriting text to sound "funny" or "emotional" may distort factual information. Ensuring that the model keeps the original meaning while changing only the tone requires careful dataset design and often multiple rounds of review.
Data scarcity for specific or rare styles: Some styles are uncommon or hard to find in publicly available text. For example, a very formal, legalistic style or the voice of a specific author might not exist in large corpora. In such cases, you either have to manually create examples or use synthetic generation, which may introduce noise or artifacts.
Adapting tone or style requires a dataset that is high-quality, consistent, diverse, and representative, which is much harder to collect and define than datasets for factual tasks. The subjectivity of style, the risk of content distortion, and the need for broad coverage make style adaptation a non-trivial challenge. This includes that creating such a dataset with the help of large(er) LLMs as we did for our example dataset can be problematic in practice.
Using large LLMs to create a dataset for style or tone adaptation might seem convenient, but it comes with notable risks. First, the model may introduce biases or inconsistencies in the generated examples. Since the LLM reflects patterns from its training data, it might exaggerate certain expressions, adopt unintended tones, or produce outputs that are subtly influenced by stereotypes or unwanted stylistic quirks. This can make the resulting dataset less reliable for training a model to produce a consistent, controlled style. Second, relying on an LLM to generate style-specific examples can lead to data drift or overfitting to the model's own "voice". This can reduce diversity and limit the model's ability to generalize to real-world prompts. In other words, you risk creating a dataset that is convenient but not fully representative or high-quality for teaching nuanced stylistic behavior.
Evaluation
We evaluated the effect of our fine-tuning approach simply bey comparing the responses for 5 example questions. While the result generalled "looked good", are more systematic evaluation is required. Evaluating a fine-tuned model for style adaptation is different from evaluating it for accuracy or factual correctness. Since the goal is not whether the model gives the right answer, but whether it communicates in the intended way, you need a systematic process that combines both quantitative and qualitative methods, including:
Define the target style clearly: Before evaluation, you should spell out what the target style means. For example, if you want a “friendly” style, describe it with concrete features: shorter sentences, use of casual words, more emojis, or softer tone. For a “professional” style, you might expect formal vocabulary, no slang, and polite phrasing. These style rules form the evaluation baseline.
Create a test set with varied prompts: Prepare a fixed set of prompts covering different scenarios — questions, requests, and edge cases. The prompts should be diverse enough to show whether the style is applied consistently. This ensures that the evaluation does not depend on just a few cherry-picked examples.
Automatic metrics (quantitative check): You can use natural language processing (NLP) tools to measure some style aspects such as readability scores (e.g., Flesch-Kincaid to quantify sentence complexity, lexical features (e.g., average sentence length, word choice frequency, sentiment polarity), or style classifiers (e.g., a pretrained model trained to recognize tone). These give objective signals about whether the outputs match the intended style.
Human evaluation (qualitative check): Since style is subjective, human judges are essential. Ask multiple evaluators to rate model outputs on criteria like style alignment (Does it match the intended tone?), consistency (Is the style applied across all responses?), appropriateness (Is the style suitable for the situation?). For example, you can use Likert scales (1–5) for ratings to make results measurable.
In short, a proper evaluation of a fine-tuned model — particularly when we want to measure subjective results such as different styles/tones — can be quite challenging and involves many steps. However, these efforts are beyond the scope of this notebook which focuses on the basic steps required for fine-tuning pretrained models.
Summary
This notebook provides a basic tutorial on fine-tuning a pretrained model for style adaptation using Hugging Face libraries. Its primary goal is to introduce the key steps in the process, giving readers a hands-on understanding of how a model’s tone or style can be adjusted. The tutorial walks through tasks such as loading a pretrained model and tokenizer, preparing a dataset with examples in the target style, setting up the training loop or Trainer API, and applying evaluation methods to check style alignment. The emphasis is on clarity and simplicity, making it accessible even for those new to model fine-tuning.
The notebook highlights that fine-tuning for style is different from fine-tuning for factual tasks. Rather than teaching the model new knowledge, the goal is to modify the way it expresses existing knowledge, such as changing tone, formality, or writing style. Example prompts and target outputs demonstrate how small adjustments in the training data can influence the model’s responses. This hands-on approach helps users grasp the concept that style adaptation largely relies on carefully curated examples rather than simply increasing dataset size.
While the tutorial focuses on the basic steps, it also notes that fine-tuning models in practice can be much more complex. Creating high-quality style datasets is challenging because style is subjective, and maintaining consistency across diverse prompts is difficult. Additionally, managing memory usage, batch sizes, and hyperparameters becomes important when scaling to larger models, and the notebook briefly introduces these considerations without delving into advanced techniques. The notebook also touches on evaluation strategies, showing both automatic metrics (like sentiment or formality classifiers) and human assessment methods. These help users verify whether the model is successfully adapting its style while still preserving the intended meaning of responses. By combining these approaches, the tutorial gives a foundational understanding of style fine-tuning without assuming prior deep knowledge of model training.
Overall, the notebook serves as a starting point for experimenting with style adaptation, providing a practical, step-by-step introduction. It encourages users to explore and iterate while also acknowledging the real-world challenges involved in fine-tuning large language models, preparing them for more advanced projects in the future.